下面介绍windows如何编译hiredis,以及如何使用hiredis
环境
编译环境,64位windows8.1 ultimate,VS2013社区版 update5.
注意:这里vs一定要2013 update 5,否则无法正常编译,报错“make sure you have updated to Update 5, otherwise you will get a “illegal use of this type as an expression” error.”
获取redis windows
GitHub上的MSOpenTech/redis项目地址,download zip
编译Redis
解压,进入msvs文件夹,解决方法RedisServer.sln
如果只需要,hiredis.lib和win32_interop.lib,则只需要从解决方案资源管理器窗口编译hiredis工程和Win32_Interop工程,此时便会在x64/debug目录下生成这两个工程编译的lib
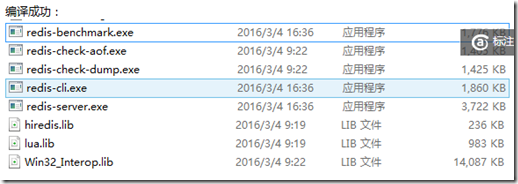
注意:需要在上一步中,配置一下为x64结构,然后编译,在x64目录下可以看到如下结构:
使用Hiredis
具体hiredis api参考:https://github.com/redis/hiredis
步骤:
1 新建工程
2 在工程属性中添加附加包含目录,redis/src和deps/hiredis
3 添加附加库目录,指之前生成lib的目录,一般指”redis/msvs/x64
4 添加附加依赖项:hiredis.lib 和 win32_interop.lib,可能也需要ws2_32.lib.
5 复制src/Win32_Interop/win32fixes.c到自己的工程目录
6 然后添加如下的实例代码,需要include<hiredis.h>和<win32_interop\win32fixes.h>,然后编译运行即可。
#include <ctime>
#include <hiredis.h>
#include <Win32_Interop/win32fixes.h>
int main()
{
    redisContext *c;
    redisReply *reply;

    //测试连接
    c = redisConnect((char*)"127.0.0.1", 6379)
    if (c != NULL && c->err) {
        printf("Error: %s\n", c->errstr);
        // handle error
    } else {
        printf("Connected to Redis\n");
    }
    //set hello world
    reply = (redisReply *)redisCommand(c, "SET %s %s", "hello", "world");
    printf("SET: %s\n", reply->str);
    freeReplyObject(reply);
    //get hello
    reply = redisCommand(c,"GET %s","hello");
    printf("%s\n",reply->str);
    freeReplyObject(reply);

    return 0;
}
可能出现的错误
1 “预编译头文件来自编译器的早期版本,或者预编译头为 C++ 而在 C 中使用它”,解决方法:在 solution explorer 中对相应文件点右键选择 properties,在 precompiled headers 项下设置 not using… 即可。
2 “各种重复定义”,解决方法:请右击项目->属性->配置属性->C/C++->代码生成->运行库->改成多线程调试(/MTd)或多线程(/MT)